
Setup
This page covers the configuration done once, after installation, before users start sending invoices.
Setup checklist
Section titled “Setup checklist”- Choose your service model and sign the agreement with Xago Software AS — see Access point and agreement.
- Fill in the Xago Invoice section of the XAGO Setup page, including the access point credentials under EHF API.
- Run Customer Invoicing Configuration so existing customers are set up for e-invoicing.
- Set up the job queue for sending and status retrieval.
The XAGO Setup page
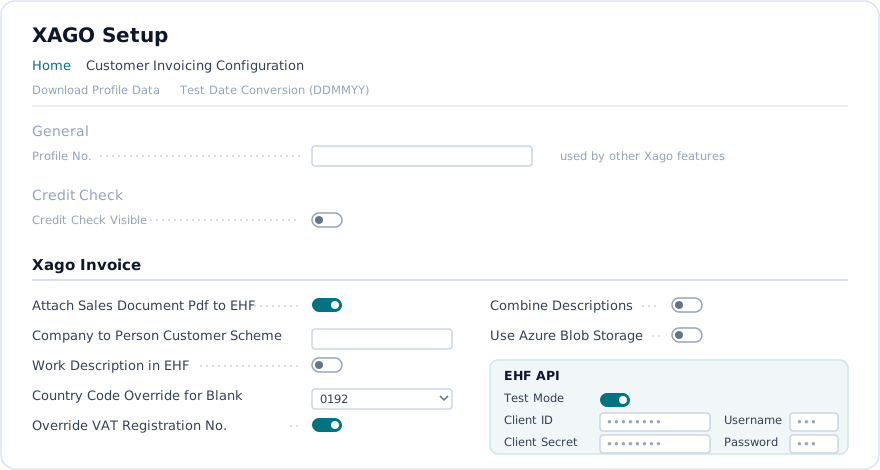
Section titled “The XAGO Setup page”Search for XAGO Setup. The page is shared with other Xago features, so only one of its sections concerns Xago Invoice:
| Section | Relevant to Xago Invoice? |
|---|---|
| General (Profile No.) | No — used by other Xago features. Leave it as it is. |
| Credit Check | No — belongs to a separate Xago feature. |
| Xago Invoice | Yes — everything below is in this section. |
Fields in the Xago Invoice section
Section titled “Fields in the Xago Invoice section”| Field | Type | What it does |
|---|---|---|
| Attach Sales Document Pdf to EHF | Toggle | TODO |
| Company to Person Customer Scheme | Text | TODO |
| Work Description in EHF | Toggle | TODO |
| Country Code Override for Blank | Code, e.g. 0192 |
TODO |
| Override VAT Registration No. | Toggle | TODO |
| Combine Descriptions | Toggle | TODO |
| Use Azure Blob Storage | Toggle | TODO |
EHF API
Section titled “EHF API”The EHF API group holds the access point connection.
| Field | Type | What it does |
|---|---|---|
| Test Mode | Toggle | TODO — confirm that this sends to the access point’s test environment and must be switched off for production. |
| Client ID | Masked text | Access point credential. TODO — where it comes from under each service model. |
| Client Secret | Masked text | Access point credential. |
| Username | Masked text | Access point credential. |
| Password | Masked text | Access point credential. |
Actions on the page
Section titled “Actions on the page”| Action | What it does |
|---|---|
| Customer Invoicing Configuration | Updates existing customers with e-invoicing defaults. See below. |
| Download Profile Data | TODO |
| Test Date Conversion (DDMMYY) | TODO |
Document sending profile
Section titled “Document sending profile”Installing the app creates the document sending profile XINV, with the description Xago Invoice, and sets it as the default profile. A customer sends through Xago Invoice when its Document Sending Profile is XINV and E-Invoice is switched on. New customers pick up the default profile; existing customers need to be updated, which is what the next section does.
Customer Invoicing Configuration
Section titled “Customer Invoicing Configuration”The Customer Invoicing Configuration action on the XAGO Setup page updates all existing customer records in one go, so you do not have to edit them one by one.
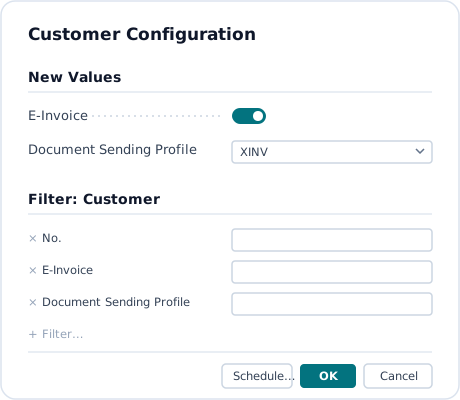
- On the XAGO Setup page, choose Customer Invoicing Configuration.
- Under New Values, switch E-Invoice on and set Document Sending Profile to XINV.
- Under Filter: Customer, narrow the run if you do not want every customer updated — for example by customer number range, or only customers whose sending profile is still blank. Leave the filters empty to update all customers.
- Choose OK to run it now, or Schedule… to run it through the job queue.
Every customer within the filter gets the new values. Customers created afterwards get the default profile automatically, but E-Invoice must still be switched on for them.
Permissions
Section titled “Permissions”The XINV Admin role unlocks Force Send on posted documents, which resends a document regardless of its status. Give it to the people who handle failed deliveries, not to everyone who posts invoices. See Distribution status.